CNC Plasma | Xbox 360 Controller

I was browsing the internet today searching for a way to control my CNC Plasma without having to spend a fortune. I came across a plugin that allowed me to use an Xbox 360 controller to run my machine. Now since my machine uses Mach 3 software and CandCNC hardware, I was skeptical as to the success of this plugin, but not enough to try it for myself. I looked into the CandCNC pendent control, but at $200+ it was a little out of the price range for the need. After all this is for convenience and not necessary. At that is what I though at first, but more on that later.
To install this you will need to find a couple of items.
- New Xbox 360 Wired controller. Mine has a 9 ft cord so I can reach the entire table. A wireless would work too, but not wanted to waste money on batteries I opted for a wired controller
- Go to Mach 3 website and download the plugin. Down towards the bottom of the list is “Xbox 360 Controller”. Download the plugin and the documentation. This will aide in installing.
- Download the driver for the Xbox controller from Microsoft called Xbox360_32Eng.exe
- Plugin the Xbox 360 Controller into a USB slot in the computer. Your computer should pop up a couple of messages indicating it has recognized a USB device. It should also light up one quadrant of the Xbox button (big one, center of top with an “x” on it), showing everything is working fine.
- Place he plugin into the Mach3 installation folder within the Plugins directory. Double click it to install the plugin.
- Start Mach3, and click on Config/Config Plugins. You should see a line for Xbox 360. Click on the red “x” beside the Xbox 360 to turn it into a green check mark. Then click on the yellow highlighted “CONFIG” in the same line. (If you do not see this plugin, go back to where you saved the downloaded plugin file, and click on it).
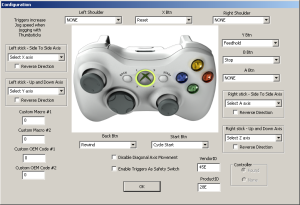 I adjusted the setting to my liking as seen in photo.

That is all that is needed to get the controller working. Just remember to close Mach3 if the setting changes are not updating correctly after changing the settings. I noticed that when I changed the z-axis from the “side to side” setting to “up and down” setting it was moving at a really slow speed. After restarting Mach3 the issue went away.
Also you have the ability to assign custom Macros to button as desired. More on this in a later post.
Overall this is a simple upgrade, but very useful. I didn’t realize how much easier it is to position the torch in a location by being able to move to a place that you could see better and not reach for the keyboard. Not to mention having the reset button in your hand in case something crashes.